Table of Contents
ToggleA kitchen island isn’t just a passing trend, it’s a practical workhorse that does heavy lifting in almost any kitchen. Whether you’re looking to add prep space, extra seating, or storage, kitchen island furniture solves real problems for busy households. If you’re considering adding one to your kitchen, you’ve got plenty of options, from ready-made units to custom DIY builds. This guide walks you through what matters: styles, sizing, functionality, and projects you can tackle yourself.
Key Takeaways
- A kitchen island furniture piece expands prep space, adds storage, and shortens distance between appliances, improving workflow and efficiency in any kitchen size.
- Kitchen islands require at least 3 to 4 feet of clearance on all sides and should occupy no more than one-third of your total kitchen square footage for safe traffic flow.
- Modern islands favor clean lines and minimalist designs, while farmhouse and traditional styles emphasize warmth through detailed cabinetry and rustic materials like reclaimed wood.
- Smart storage features like deep drawers with dividers, pull-out shelves, and full-extension slides transform an island into a functional time-saver for everyday kitchen items.
- A basic DIY kitchen island project can be completed in a weekend using prefabricated base cabinets, standard tools, and materials like butcher block or laminate countertops.
- Seating and social features turn a kitchen island into a gathering point, making it more valuable beyond pure storage and prep functionality.
What Makes a Kitchen Island Essential
A kitchen island serves as a central hub that expands your work surface, adds storage, and creates gathering space, all while improving workflow. In most kitchens, islands shorten the distance between appliances and prep zones, cutting down wasted steps during cooking. Beyond function, islands anchor the room visually and can dramatically change how a kitchen feels and flows.
They’re especially valuable in smaller kitchens where counter space is precious. An island gives you a secondary prep surface without taking up wall real estate. For larger kitchens, an island transforms a hollow center into an active zone, keeping family and guests involved while you cook.
Islands also hide clutter effectively. Deep drawers, shelving, and cabinet doors keep everyday items, spices, baking pans, linens, out of sight while staying within arm’s reach. Seating on one or both sides turns the island into a gathering spot for morning coffee, assignments, or casual meals, which many households prefer to formal dining tables.
Popular Kitchen Island Styles and Designs
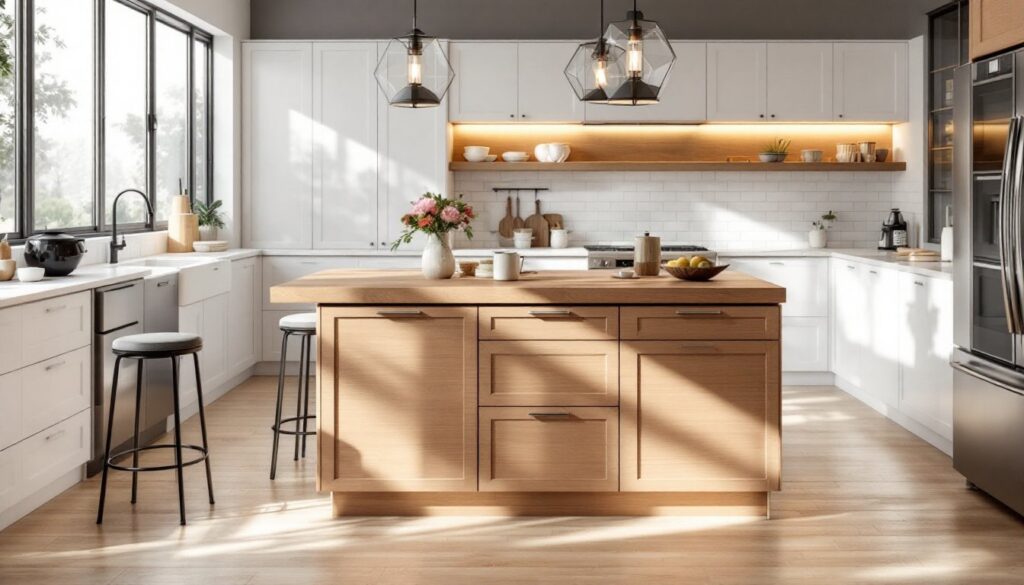
Modern and Contemporary Islands
Modern kitchen islands prioritize clean lines, minimalist surfaces, and integrated appliances or cooktops. Sleek white, gray, or natural wood finishes dominate, often paired with stainless-steel hardware and waterfall-edge countertops (where the counter material wraps down one or both sides like a waterfall). Many modern islands feature handleless drawer fronts or push-to-open doors, creating an uncluttered look.
Contemporary islands often incorporate a single, bold material, thick butcher block, polished concrete, or large-format quartz, as a statement piece. Seating is minimal and purpose-driven, with bar stools tucked partially under the overhang rather than consuming the full perimeter. Pendant lighting directly above the island is standard: oversized globe or geometric fixtures are popular choices. Resources like Homedit showcase modern island designs that blur form and function beautifully.
Traditional and Farmhouse Islands
Traditional islands celebrate warmth through detailed cabinetry, decorative molding, and furniture-like proportions. Think paneled cabinet doors, turned legs, and finishes like soft white, cream, or painted cottage blue. Granite or marble countertops reinforce the classic aesthetic, often with an overhang deep enough for comfortable seating on all sides.
Farmhouse islands lean harder into rustic charm with reclaimed wood tops, butcher block surfaces, and open shelving for displaying bowls and cookware. Many farmhouse designs include a shallow prep sink and vintage-style faucets. Seating often features upholstered chairs or mixed wood stools that look pulled from different eras, adding character. Both styles favor multiple light fixtures, wrought-iron chandeliers, vintage pendant lights, or glass-and-brass combinations, that hang lower than their modern counterparts. Detailed buying guides at remodelista.com cover curated island options across price points and styles.
Choosing the Right Size and Layout
Size matters more than style when it comes to functionality. A kitchen island needs at least 3 to 4 feet of clearance on all sides to allow traffic flow and cabinet/appliance doors to open safely. Measure your kitchen floor space first, a good rule is that an island should occupy no more than one-third of your total kitchen square footage.
Standard island dimensions run 24 to 36 inches deep (front to back) and 3 to 6 feet long (side to side), though custom builds can vary. If you’re adding seating, allow 24 to 30 inches of counter depth for a comfortable overhang where someone can sit with legs underneath. The standard counter height is 36 inches, the same as perimeter countertops, unless you’re creating a specialized bar island (which may be 42 inches high).
Layout depends on your kitchen’s existing footprint. In galley kitchens, a long, narrow island parallel to the main counter works best. In L-shaped or open kitchens, a square or rectangular island near the center creates a natural gathering point. Consider how utilities, gas lines for cooktops, electrical for warming drawers or ice makers, plumbing for sinks, must run underneath. Most islands sit on a recessed toe-kick (about 4 inches) for comfortable leg room when standing or sitting at seating areas. Kitchen design resources like The Kitchn offer detailed layouts for different kitchen configurations.
Storage and Functionality Features
Smart storage transforms an island from a pretty surface to a genuine time-saver. Consider what you use daily, mixing bowls, utensils, baking sheets, cookbooks, and plan drawers and cabinets accordingly. Deep drawers with dividers keep items organized: pull-out shelves maximize access to items stored toward the back.
Drawers should have full-extension slides (hardware that lets them open completely without items falling out) and heavy-duty construction to handle repeated use. Cabinet doors work for less-frequently accessed items like holiday dishes or bulk pantry goods. Open shelving displays attractive items like cookbooks or matching bowls but requires honest maintenance since clutter shows immediately.
Functionality goes beyond storage. A prep sink with a dedicated faucet turns your island into a full secondary work station. Cooktops or range hoods mounted on islands require proper ventilation: downdraft systems pull smoke and steam down through the counter rather than hanging from above, which gives you more headroom and design flexibility. Warming drawers, ice makers, wine coolers, and trash pullouts are popular add-ons, though they increase both cost and complexity (especially plumbing and electrical demands).
For most DIY projects, keep it simpler: quality drawers, useful cabinet space, and a durable countertop that can handle prep work. Seating, whether stools tucked under an overhang or a full dining side, doubles the island’s social function, making it a gathering point rather than just another counter.
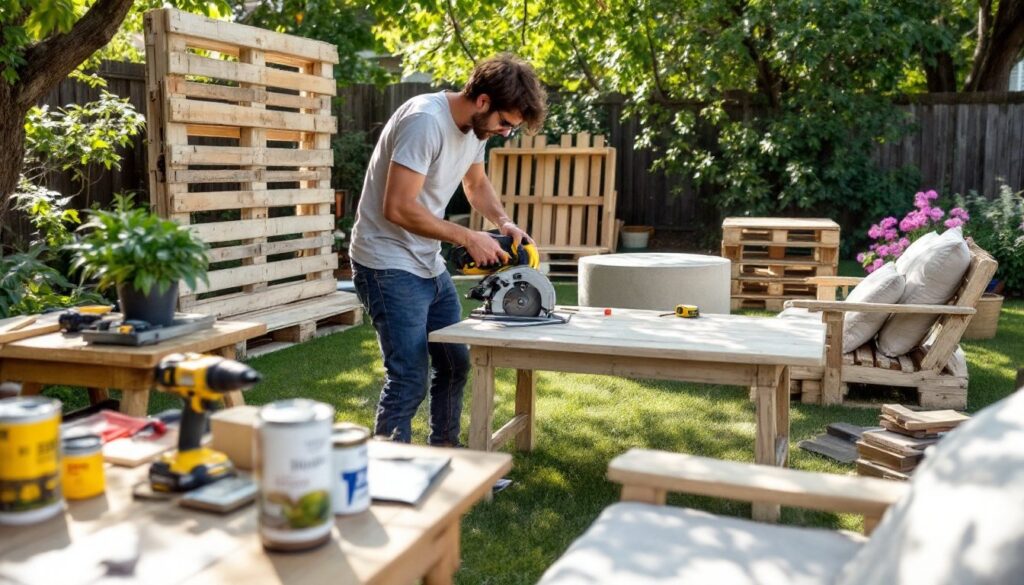
DIY Kitchen Island Projects for Homeowners
Building a basic kitchen island is an achievable weekend project if you’re comfortable with hand tools and level measurements. The simplest approach uses a prefabricated kitchen base cabinet (often called a sink base or standard base, available from big-box retailers in 24- to 36-inch widths) as your foundation.
Materials & Tools You’ll Need:
- Prefab base cabinet(s)
- Countertop material (butcher block, laminate, or plywood with edge banding)
- Wood screws, wood filler, sandpaper
- Circular saw or miter saw
- Drill with bits, level, tape measure
- Safety glasses, work gloves, dust mask
- Optional: casters (locking wheels) if mobility is desired
Basic Steps:
-
Prepare the space. Clear the kitchen and measure the final island footprint carefully. Mark the corners with painter’s tape so you know exactly where it sits.
-
Assemble the cabinet. Follow the manufacturer’s instructions for the base unit. Use a power drill to drive screws, hand-screwing takes forever and tires your wrist. Ensure it’s level front-to-back and left-to-right using a 24-inch or 32-inch level: shim underneath with plastic shims if needed.
-
Install the countertop. Cut your countertop material to size (add a 1.5-inch overhang on the seating side for legroom). Attach it with construction adhesive and pocket-hole screws driven from underneath so fasteners don’t show. Butcher block requires mineral oil sealing before use: laminate needs edge trim glued and screwed on.
-
Secure everything. If the island isn’t anchored to the floor, secure it to the subfloor with L-brackets underneath so it won’t shift when someone leans on it.
-
Finishing touches. Sand and fill any gaps, apply finish (paint, stain, or sealer depending on material), and add casters if you want mobility for cleaning behind it.
For advanced builders: a custom-framed island built from 2×4 studs, 3/4-inch plywood, and 1×12 or 1×10 boards for face framing gives you total design control and costs less per square foot than buying multiple prefab units. Frame the base using a 16-inch stud spacing on center for solid support: the countertop will be supported by the framing, not hanging unsupported. Structural integrity matters, an island has no wall bracing, so every corner and joint must be rock-solid.
Safety note: Moving a finished island weighing 300+ pounds requires at least two people and a dolly. Install locking casters rated for at least 200 pounds per wheel if you want portability. Never rely on an island to be mobile if you’re planning to install a cooktop or sink, utilities should be permanent.
Final Thoughts
A kitchen island transforms how you cook, gather, and use your space. Whether you choose a ready-made unit, customize a prefab base, or build from scratch, focus on size, clearance, and realistic functionality. Start simple with storage and seating, then upgrade to specialized features like sinks or cooktops once you understand your actual kitchen workflow. Honest prep work and smart sizing matter far more than trendy finishes, get those right, and you’ll have an island that earns its place for years.